Puara Module
Société des Arts Technologiques (SAT)
Input Devices and Music Interaction Laboratory (IDMIL)
Overview
Puara Module is a library for ESP32 boards that provides a simplified interface for managing WiFi, a web server, and a filesystem. It facilitates the creation of distributed interactive systems, networked controllers, and similar applications, allowing users to focus on prototyping the rest of their system.
Getting Started
This documentation is divided into two main sections:
1. Building Puara Module Templates/Examples
Choose your preferred development environment. We offer almost identical templates for both Arduino IDE and PlatformIO.
| Environment | Recommended For |
|---|---|
| Arduino IDE | Beginner to intermediate programmers |
| PlatformIO | Intermediate to advanced programmers, or users wanting more control |
Once your project is running, use the Browser Pages to configure your device’s network settings and custom variables.
2. Developer Reference
Technical documentation for understanding and extending the codebase:
- Puara API - Main
Puaraobject and its methods - Filesystem - LittleFS vs SPIFFS configuration
- Web Server - Integrated web server for device configuration
- WiFi - WiFi connection management
- Serial and Debug Logging - Serial communication and debug output
- mDNS - Local network device discovery
Puara Module for Arduino
Dependencies
⚠️ Download Arduino 2.0 IDE for build/upload of program.
⚠️ Install Arduino-LittleFS-Upload for filesystem uploading.
⚠️ ESP32 board library: Open Boards Manager icon in Arduino 2.0 IDE, type esp32 in the Boards Manager search bar and install esp32 by Espressif Systems.
⚠️ Partition size options: Select any options that offer minimal partition before building the program. These options vary depending on board capabilities and can be found here: /Tools/Partition Scheme/. A common option is Minimal SPIFFS such as: /Tools/Partition Scheme/Minimal SPIFFS.
Warning: some boards simply do not have such options.
How to Use
-
Install Arduino 2.0 IDE
-
Download the
puara-modulelibrary from Library Manager -
Open a puara template in Arduino IDE: Open Arduino IDE, go to File/Examples/puara-module/ and select the template of your choice.
-
Configure the board: Ensure the
boardandportvariables in the IDE match your board. -
Edit partition scheme: Allow more space for your programs. Go to:
- Tools/Partition Scheme/
Select
Minimal Spiffsor similar option. Different boards have different possibilities but generally theMinimal Spiffs:...option should be present.
-
Edit the template: You are now ready to edit the template according to your board/needs.
-
Edit the filesystem: To modify network configurations, add or modify the available variables in the settings, go to:
Sketch/Show Sketch Folderwhich will open your local project folder- Enter
data/folder:- Modify network name (SSID) and password (PSK) configurations in config.json;
- Modify/Add variables in settings.json;
- Save your modifications.
- Build and upload the filesystem and firmware: Once ready, you can:
- Use Arduino IDE to build and upload the firmware to your board.
- Use Arduino-LittleFS-Upload for the filesystem uploading:
[Ctrl]+[Shift]+[P], then “Upload LittleFS to Pico/ESP8266/ESP32”.
On macOS, press [⌘] + [Shift] + [P] to open the Command Palette in the Arduino IDE, then “Upload LittleFS to Pico/ESP8266/ESP32”.
- Test your IoT device and validate communication between systems: At this point your board should either connect to your specified network if it can find it. In either case, if it does or doesn’t connect, your board will create an Access Point you can connect to directly. Use the board’s IP address to communicate with it when needed. More details below.
⚠️ Important detail for users
Most Arduino or embedded projects only upload the code that runs on the device. However, in this project, the device also needs a filesystem to store important data, such as configuration files, templates, or other resources that the code relies on. These two parts—code and filesystem—serve different purposes and must be built and uploaded separately. The executable code tells the device what to do, includes the logic, instructions, and behavior of the device such as how to read a sensor, process data, or send information over Wi-Fi. The filesystem is like a “hard drive” for the device, where additional files are stored and can include configuration files, templates, or other resources that the code needs to function properly. In our approach, the filesystem stores a JSON file with user settings for the network configurations and some global variables that can be modified through the browser without needing to reflash the whole system.
How It Works
⚠️ Every template related to Puara Module has a different set of options but they all generally respect the following explanation. If needed, the following sections are detailed more thoroughly in the Puara Module Book
1. Establishing WiFi
When initiating the program, the module manager will try to connect to the WiFi Network (SSID) defined in config.json.
The puara-module supports three modes of operation:
-
Station - Access Point (STA-AP) Mode (Default):
- The device connects to an existing WiFi network (station).
- The device creates its own WiFi network (access point).
- User has two ways to communicate with the board.
-
Access Point (AP) Mode:
- The device does not connect to an existing WiFi network.
- The device creates its own WiFi network (access point).
-
Station (STA) Mode:
- The device connects to an existing WiFi network.
- The Access Point is turned off with
persistent_AP=0 - Useful to limit WiFi pollution and secure the device.
2. Making the Web Server Accessible
Browser-accessible pages available for configuring, scanning, and managing settings on your device are made available through Puara Module.
Once the web server is running, you can access it in two ways:
-
Via IP Address: Navigate to the device’s IP address in your web browser (e.g.,
http://192.168.4.1for AP mode, or the assigned IP in STA/STA-AP modes which can be retrieved usingpuara.staIP()). -
Via mDNS Hostname: If mDNS is enabled, you can access the device using its hostname (e.g.,
http://your-device-name.local). Defaultconfig.jsonvalues enable mDNS with the Puara_001, and browser is accessible withpuara_001.local.
Using the web browser, users can modify variables that keep their value after reboot/shutdown of device without needing to rebuild/upload their program. Access these values in the program by using:
// For text fields
std::string my_string = puara.getVarText("variable_name");

// For number fields (all numbers are `doubles` -- see JSON documentation for explanation)
double my_number = puara.getVarNumber("variable_name");
Making of Custom Variables in settings.json
The /data/settings.json file stores custom application settings as an array of name-value pairs:
{
    "settings": [
        {
            "name": "user_defined_text",
            "value": "user defined value"
        },
        {
            "name": "variable3",
            "value": 12.345
        }
    ]
}
User may add/modify fields in this file and then upload the new filesystem in order to have a more custom device.
For more detailed documentation, please refer to the Puara Module developer documents
Examples
The puara-arduino repository includes five Arduino sketches that demonstrate different use cases and functionalities. All examples are identical to the PlatformIO templates available in puara-module-templates.
Each example includes a data/ folder containing configuration files (config.json, settings.json) and web interface files (HTML and CSS).
⚠️ After building and uploading the firmware to your board, you must also upload the filesystem.
1. Basic Example
File: examples/basic/basic.ino
A minimal example demonstrating core Puara Module functionality. This example:
- Initializes the Puara module manager
- Reads custom settings from the JSON configuration files
- Outputs dummy sensor data to the serial monitor
- Demonstrates how to access custom configuration variables using
getVarText()andgetVarNumber()
This is the best starting point for learning how to use the Puara framework.
2. OSC-Send Example
File: examples/OSC-Send/OSC-Send.ino
Demonstrates how to set up a basic OSC transmitter. This example:
- Sends dummy sensor data as OSC messages to a specified IP address and port
- Configurable OSC IP/port via the web interface without rebuilding/reflashing
- Shows how to use the
onSettingsChanged()callback to update parameters dynamically - Includes example code for reading analog sensors and digital signals
Note: Please refer to CNMAT’s OSC repository on GitHub for more details on OSC.
3. OSC-Receive Example
File: examples/OSC-Receive/OSC-Receive.ino
Demonstrates how to receive and process OSC messages. This example:
- Listens for incoming OSC messages on a configurable UDP port
- Parses OSC messages and extracts data from them
- Demonstrates example processing of float values to control device outputs (e.g., LED brightness)
- Shows how to use the
onSettingsChanged()callback for dynamic configuration
The example expects a float between [0,1] on the OSC address /led/brightness with the format: /led/brightness f 0.34
Note: Please refer to CNMAT’s OSC repository on GitHub for more details on OSC.
4. OSC-Duplex Example
File: examples/OSC-Duplex/OSC-Duplex.ino
Combines both OSC-Send and OSC-Receive functionality in a single sketch. This example:
- Sends dummy sensor data to a remote OSC address
- Simultaneously receives OSC messages from remote sources
- Demonstrates full duplex OSC communication patterns
- Useful for bidirectional device communication scenarios
Note: Please refer to CNMAT’s OSC repository on GitHub for more details on OSC.
5. BLE Advertising Example
File: examples/ble-advertising/ble-advertising.ino
Demonstrates BLE (Bluetooth Low Energy) advertising without requiring device connections. This template:
- Uses BLE advertising to broadcast device information
- Encodes sensor data as CBOR payloads in BLE manufacturer data packets
- Broadcasts at configurable frequency (default 50Hz)
- Works seamlessly with the BLE-CBOR-to-OSC script
Key Features:
- Broadcast without connection: Receive data from hundreds of BLE devices simultaneously without establishing individual connections
- Range: Tested with ~120 devices in a 0-150 metre range with updates every 500ms
- CBOR encoding: Efficient binary encoding for minimal payload
- Device identification: Each device can be assigned a unique ID via
config.jsonfor easy tracking
Use Case: Ideal for IoT scenarios where you need to monitor many sensor devices simultaneously (e.g., distributed sensor networks, interactive installations) and is well-suited for lower data-rate transmission.
Getting Started with BLE Advertising
- Build and Upload: Build and upload the firmware to your ESP32 board
- Configure Device: Optionally modify the device name and ID in
config.json - Upload Filesystem: Upload the data folder using the LittleFS upload tool
- Run BLE-CBOR-to-OSC Script:
- Clone the BLE-CBOR-to-OSC repository
- Create a Python virtual environment :
python -m venv venv - Activate the venv :
source ./venv/bin/activate - Install Python dependencies:
pip install -r requirements.txt - Run:
python ble-cbor-to-osc.py
- Receive OSC Messages: The script forwards BLE advertising data as OSC messages to
127.0.0.1:9001(configurable)
BLE Configuration
You can customize the BLE advertising behavior:
- Frequency: Modify
target_frequencyvariable (default 50Hz) - Sensor Data: Replace dummy
sensor1andsensor2with actual pin readings
For more information, see the BLE-CBOR-to-OSC script documentation.
Puara Module Template (Module Manager)
This repository contains several templates to be used as a base to create devices that can be controlled over the network.
How to Use Puara Module Templates with PlatformIO
-
Install VSCode and PlatformIO: Use Visual Studio Code as code editor with the PlatformIO IDE extension.
-
Clone the
puara-module-templatesrepository locally:git clone https://github.com/Puara/puara-module-templates.git -
Open a puara template in VS Code: Open VS Code, and select the platformIO extension on the left side. This will open the
PLATFORMIOpanel. From there select “Pick a folder”, and navigate to one of thepuara-module-templatessubfolders, e.g.,puara-module-templates/basic/(see below for a list of available templates). Click the “Select Folder” button. Wait for a bit while PlatformIO configures your project.
-
Configure the board: Ensure the
boardvariable in theplatformio.inifile matches your board’s name. If needed you can find valid board IDs in Boards catalog, Boards Explorer or by using the pio boards terminal command. -
Edit the template: You are now ready to edit the template according to your board/needs.
-
Build and upload the filesystem and firmware: Once ready, you can use PlatformIO to build and upload the filesystem and firmware to your board. You can access the
PLATFORMIOProject Tasks by clicking on the extension button on the left. Make sure you upload both the filesystem (Build/Upload Filesystem Imageunder thePlatformicon) and the firmware (Build/Uploadunder theGeneralicon).
⚠️ Important detail for users
Most embedded projects only upload the code that runs on the device. However, in this project, the device also needs a filesystem to store important data, such as configuration files, templates, or other resources that the code relies on. These two parts—code and filesystem—serve different purposes and must be built and uploaded separately. The executable code tells the device what to do, includes the logic, instructions, and behavior of the device such as how to read a sensor, process data, or send information over Wi-Fi. The filesystem is like a “hard drive” for the device, where additional files are stored and can include configuration files, templates, or other resources that the code needs to function properly. In our approach, the filesystem stores a JSON file with user settings for the network configurations and some global variables that can be modified through the browser without needing to reflash the whole system.
How It Works
Every template related to Puara Module has a different set of options but they all generally respect the following explanation. The following sections are detailed more thoroughly in the Puara Module Book.
1. Establishing WiFi
When initiating the program, the module manager will try to connect to the WiFi Network (SSID) defined in config.json.
The puara-module supports three modes of operation:
-
Station - Access Point (STA-AP) Mode (Default):
- The device connects to an existing WiFi network (station).
- The device creates its own WiFi network (access point).
- User has two ways to communicate with the board.
-
Access Point (AP) Mode:
- The device does not connect to an existing WiFi network.
- The device creates its own WiFi network (access point).
-
Station (STA) Mode:
- The device connects to an existing WiFi network.
- The Access Point is turned off with
persistent_AP=0 - Useful to limit WiFi pollution and secure the device.
2. Making the Web Server Accessible
Browser-accessible pages available for configuring, scanning, and managing settings on your device are made available through Puara Module.
Once the web server is running, you can access it in two ways:
-
Via IP Address: Navigate to the device’s IP address in your web browser (e.g.,
http://192.168.4.1for AP mode, or the assigned IP in STA/STA-AP modes which can be retrieved usingpuara.staIP()). -
Via mDNS Hostname: If mDNS is enabled, you can access the device using its hostname (e.g.,
http://your-device-name.local). Defaultconfig.jsonvalues enable mDNS with the Puara_001, and browser is accessible withpuara_001.local.
Using the web browser, users can modify variables that keep their value after reboot/shutdown of device without needing to rebuild/upload their program. Access these values in the program by using:
// For text fields
std::string my_string = puara.getVarText("variable_name");

// For number fields (all numbers are `doubles` -- see JSON documentation for explanation)
double my_number = puara.getVarNumber("variable_name");
Making of Custom Variables in settings.json
The /data/settings.json file stores custom application settings as an array of name-value pairs:
{
    "settings": [
        {
            "name": "user_defined_text",
            "value": "user defined value"
        },
        {
            "name": "variable3",
            "value": 12.345
        }
    ]
}
User may add/modify fields in this file and then upload the new filesystem in order to have a more custom device.
Available Templates
The puara-module-templates repository includes multiple examples demonstrating different use cases and functionalities.
Each example includes a data/ folder containing configuration files (config.json, settings.json) and web interface files (HTML and CSS).
⚠️ After building and uploading the firmware to your board, you must also upload the filesystem.
1. Basic Example
A minimal example demonstrating core Puara Module functionality. This template:
- Initializes the Puara module manager
- Reads custom settings from the JSON configuration files
- Outputs dummy sensor data to the serial monitor
- Demonstrates how to access custom configuration variables using
getVarText()andgetVarNumber()
This is the best starting point for learning how to use the Puara framework.
2. OSC-Send Example
Demonstrates how to set up a basic OSC transmitter. This template:
- Sends dummy sensor data as OSC messages to a specified IP address and port
- Configurable OSC IP/port via the web interface without rebuilding/reflashing
- Shows how to use the
onSettingsChanged()callback to update parameters dynamically - Includes example code for reading analog sensors and digital signals
Note: Please refer to CNMAT’s OSC repository on GitHub for more details on OSC.
3. OSC-Receive Example
Demonstrates how to receive and process OSC messages. This template:
- Listens for incoming OSC messages on a configurable UDP port
- Parses OSC messages and extracts data from them
- Demonstrates example processing of float values to control device outputs (e.g., LED brightness)
- Shows how to use the
onSettingsChanged()callback for dynamic configuration
The example expects a float between [0,1] on the OSC address /led/brightness with the format: /led/brightness f 0.34
Note: Please refer to CNMAT’s OSC repository on GitHub for more details on OSC.
4. OSC-Duplex Example
Combines both OSC-Send and OSC-Receive functionality in a single sketch. This template:
- Sends dummy sensor data to a remote OSC address
- Simultaneously receives OSC messages from remote sources
- Demonstrates full duplex OSC communication patterns
- Useful for bidirectional device communication scenarios
Note: Please refer to CNMAT’s OSC repository on GitHub for more details on OSC.
5. BLE Advertising Example
Demonstrates BLE (Bluetooth Low Energy) advertising without requiring device connections. This template:
- Uses BLE advertising to broadcast device information
- Encodes sensor data as CBOR payloads in BLE manufacturer data packets
- Broadcasts at configurable frequency (default 50Hz)
- Works seamlessly with the BLE-CBOR-to-OSC script
For detailed setup instructions and configuration options, refer to the template’s README file.
6. Basic Gestures Example
Extends the basic template with gesture recognition capabilities using an IMU (Inertial Measurement Unit). This template:
- Demonstrates how to read and process IMU sensor data
- Includes gesture detection logic
- Shows integration with the Puara module system
7. Button OSC Example
Demonstrates how to use button inputs with Puara gestures and OSC messaging. This template:
- Reads digital button inputs (simulated button in template can be replaced with a real button)
- Shows event-driven communication patterns
- Evaluates the user interaction with the button to determine if it is being held, pressed once, twice, or three times in a row, and so on
- Sends button state changes as OSC messages
8. Libmapper OSC Example
Demonstrates integration with libmapper, a distributed signal mapping system. This template:
- Uses libmapper to register signals that can be mapped remotely
- Combines libmapper with OSC messaging capabilities
- Shows how to use the Puara framework with advanced mapping scenarios
Browser Pages
This document explains the browser-accessible pages available for configuring, scanning, and managing settings on your device. For technical details on the web server itself, see Web Server.
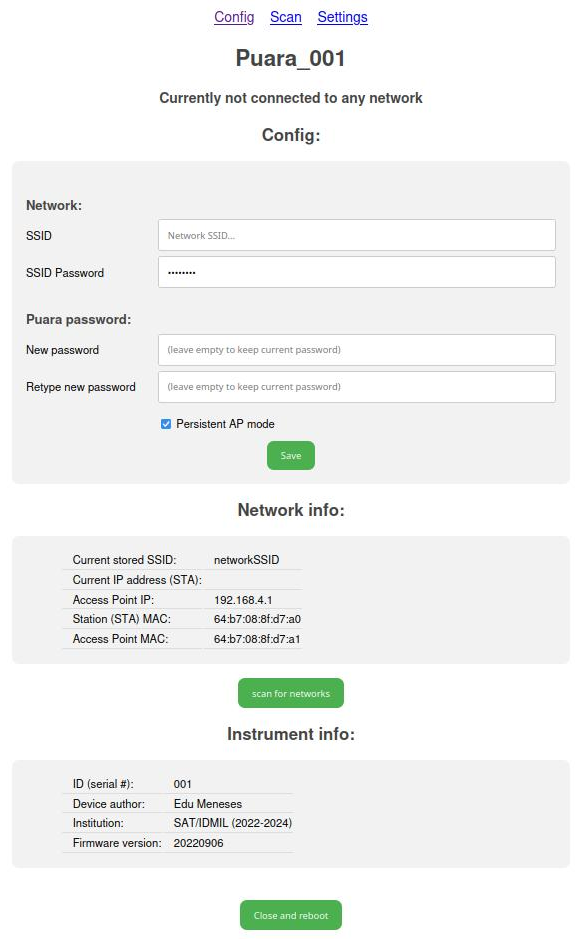
Config Page
The Config Page is the main page of the web interface, allowing you to manage network and device configuration parameters.
Key Parameters
| Parameter | Description |
|---|---|
| Network SSID | The external WiFi network name you want to connect to. |
| Network Password | The password for the external WiFi network. |
| Puara Password | The password for your device’s own WiFi access point. |
Important Notes
- After making changes, click “Close and Reboot” to restart the device and apply the changes.
- See the config.json file for all available parameters.
config.json
You can modify configuration values directly in the source file, then build and upload the filesystem. The /data/config.json file stores the main configuration of your device:
{
    "device": "Puara",
    "id": 1,
    "author": "Edu Meneses",
    "institution": "SAT/IDMIL (2025)",
    "APpasswd": "mappings",
    "wifiSSID": "SSID",
    "wifiPSK": "AP_PASSWORD",
    "persistentAP": 1
}
| Field | Description |
|---|---|
device | User-defined name for the device. |
id | User-defined device ID (useful when using multiple devices). |
author | Project author name. |
institution | Institution or organization name. |
APpasswd | Password for your device’s WiFi access point. |
wifiSSID | Name of the external WiFi network to connect to. |
wifiPSK | Password for the external WiFi network. |
persistentAP | If 1 (true), the device always creates its own access point. Set to 0 to disable and reduce radio interference. |
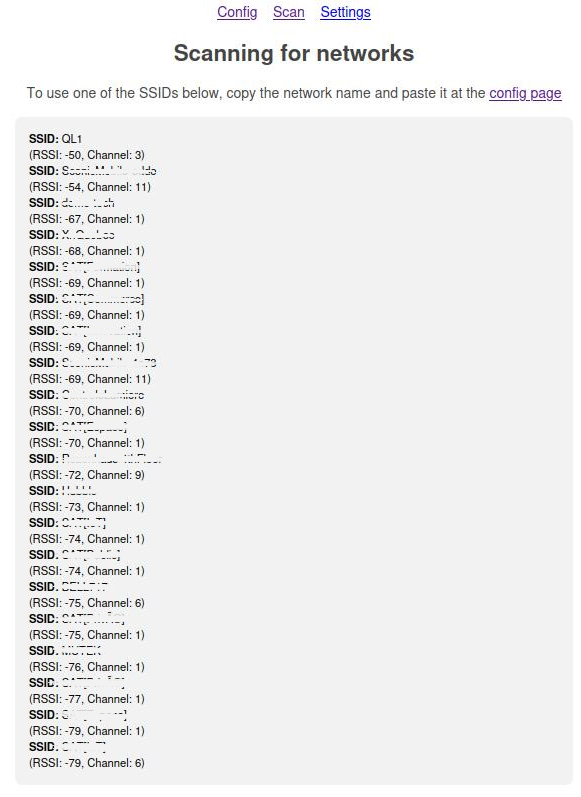
Scan Page
The Scan Page displays WiFi networks detected by your device, helping you identify available networks to connect to.
Features
- View a list of available WiFi networks with signal strength.
- Use this information to select a network for the Config Page.
- After updating the configuration, reboot the device to apply changes.
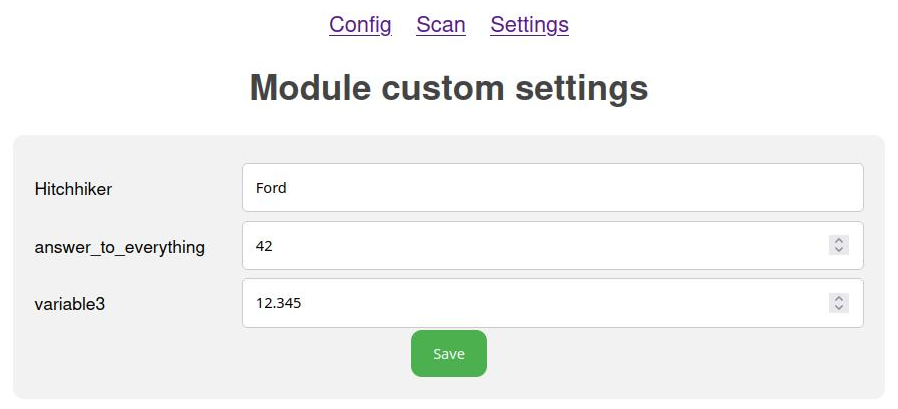
Settings Page
The Settings Page allows you to view and modify custom application variables defined in your project.
Features
- View variables: See all user-defined settings from
settings.json. - Modify values: Change values directly via the web interface. Changes persist after reboot.
- Add/remove fields: Edit the settings.json file directly, maintaining the
name:valuestructure, then rebuild and upload the filesystem.
Accessing Variables in Code
Use the following methods to retrieve variable values in your program:
// For text fields
std::string my_string = puara.getVarText("variable_name");

// For number fields (integers or floats)
int my_int = puara.getVarNumber("variable_name");
float my_float = puara.getVarNumber("variable_name");
settings.json
The /data/settings.json file stores custom application settings as an array of name-value pairs:
{
    "settings": [
        {
            "name": "user_defined_text",
            "value": "user defined value"
        },
        {
            "name": "user_defined_variable",
            "value": 42
        },
        {
            "name": "variable3",
            "value": 12.345
        }
    ]
}
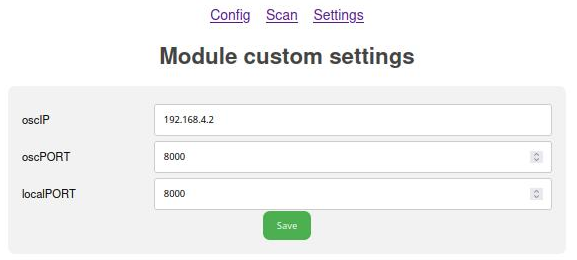
Example: OSC Settings
For projects using OSC communication, the settings page can be used to configure IP addresses and ports:
Puara API Documentation
The Puara object is the main entry point for using the puara-module library. It provides a simple interface for managing the different modules of the library, including WiFi, filesystem, web server, and more.
Initialization
To use the Puara object, you first need to include the puara.h header file and create an instance of the Puara class:
#include <puara.h>

Puara puara;
Then, in your setup() function, call the start() method:
void setup() {
    puara.start();
}
The start() method initializes the following:
- Filesystem
- Configuration and settings (from the JSON files)
- WiFi (in STA-AP, AP or STA mode)
- Web server
- Serial listening
- mDNS service
- WiFi network scanning
Public Methods
Initialization & Core
start()
void start(PuaraAPI::Monitors monitor = PuaraAPI::UART_MONITOR, esp_log_level_t debug_level = ESP_LOG_WARN);
Initializes the Puara module and all its subsystems. This is the main entry point and should be called in your setup() function.
Parameters:
monitor: Specifies the serial monitor type. Options are:PuaraAPI::UART_MONITOR(default) - Standard UART serial monitorPuaraAPI::JTAG_MONITOR- JTAG-based debugging monitorPuaraAPI::USB_MONITOR- USB serial monitor (not currently functional)
debug_level: Sets the ESP-IDF logging level. Default isESP_LOG_WARN. Other options includeESP_LOG_NONE,ESP_LOG_ERROR,ESP_LOG_INFO,ESP_LOG_DEBUG,ESP_LOG_VERBOSE.
Web Server
start_webserver()
httpd_handle_t start_webserver(void);
Starts the built-in HTTP web server for device configuration and monitoring.
Returns: A handle to the HTTP server instance (httpd_handle_t).
stop_webserver()
void stop_webserver(void);
Stops the HTTP web server.
Device Information
dmi_name()
std::string dmi_name();
Returns the DMI (Device/Module Identifier) name of the device, which is a combination of the device type and ID.
Returns: The device’s DMI name as a std::string.
version()
unsigned int version();
Returns the current firmware version number.
Returns: The version as an unsigned int.
set_version()
void set_version(unsigned int user_version);
Sets a custom firmware version number.
Parameters:
user_version: The version number to set.
Filesystem
mount()
void mount();
Mounts the device’s filesystem (LittleFS or SPIFFS). This is automatically called by start(), but can be used manually if needed.
unmount()
void unmount();
Unmounts the device’s filesystem. Useful before deep sleep or when filesystem access is no longer needed.
Configuration Management
read_config_json()
void read_config_json();
Reads the device configuration from the config.json file stored in the filesystem. This includes device name, ID, author, institution, and WiFi credentials.
write_config_json()
void write_config_json();
Writes the current device configuration to the config.json file in the filesystem.
read_settings_json()
void read_settings_json();
Reads user-defined settings from the settings.json file stored in the filesystem.
write_settings_json()
void write_settings_json();
Writes the current user-defined settings to the settings.json file in the filesystem.
set_settings_changed_handler()
void set_settings_changed_handler(std::function<void()>);
Registers a callback function that will be called whenever settings are modified (e.g., through the web interface).
Parameters:
- A
std::function<void()>callback that takes no arguments and returns nothing.
Example:
puara.set_settings_changed_handler([]() {
    Serial.println("Settings have been updated!");
    // Reload or apply new settings here
});
Serial Communication
start_serial_listening()
bool start_serial_listening();
Starts listening for serial commands. This allows configuration and control via serial terminal.
Returns: true if serial listening was successfully started, false otherwise.
send_serial_data()
void send_serial_data(std::string data);
Sends data through the serial interface.
Parameters:
data: The string data to send.
mDNS Service
start_mdns_service()
void start_mdns_service(std::string_view device_name, std::string_view instance_name);
Starts the mDNS (multicast DNS) service, allowing the device to be discovered on the local network by its hostname.
Parameters:
device_name: The hostname for mDNS discovery (e.g., “puara-device”).instance_name: A human-readable instance name for the service.
WiFi Management
start_wifi()
void start_wifi();
Starts the WiFi subsystem based on the configuration. The device can operate in:
- STA mode: Connects to an existing WiFi network
- AP mode: Creates its own access point
- STA-AP mode: Both simultaneously
wifi_scan()
void wifi_scan(void);
Initiates a scan for available WiFi networks. Results can be viewed through the web interface.
get_StaIsConnected()
bool get_StaIsConnected();
Checks if the device is connected to a WiFi network in station (STA) mode.
Returns: true if connected to a WiFi access point, false otherwise.
staIP()
std::string staIP();
Returns the device’s IP address when connected to an external WiFi access point.
Returns: The IP address as a std::string (e.g., “192.168.1.100”).
Variable Access
getVarNumber()
double getVarNumber(std::string varName);
Retrieves the value of a numeric setting variable by name from the settings.
Parameters:
varName: The name of the variable to retrieve.
Returns: The value of the variable as a double.
getVarText()
std::string getVarText(std::string varName);
Retrieves the value of a text setting variable by name from the settings.
Parameters:
varName: The name of the variable to retrieve.
Returns: The value of the variable as a std::string.
Filesystem
The puara-module library provides a simple interface for working with the filesystem. It supports both LittleFS (default) and SPIFFS, though the available options depend on your development environment.
Mounting the Filesystem
The filesystem is mounted automatically when you call the puara.start() method. You can also mount and unmount it manually using the mount() and unmount() methods:
puara.mount();
puara.unmount();
Reading and Writing Files
You can read and write configuration files using the following methods:
read_config_json()/write_config_json()- Manage theconfig.jsonfile (device configuration)read_settings_json()/write_settings_json()- Manage thesettings.jsonfile (user settings)
For working with other files, you can use the standard LittleFS or SPIFFS APIs directly.
LittleFS vs SPIFFS
By default, the puara-module library uses LittleFS, which offers better performance and wear leveling compared to SPIFFS.
Arduino IDE
When using the Arduino IDE, only LittleFS is supported. You must use the arduino-littlefs uploader tool to upload the filesystem data to your device.
PlatformIO
When using PlatformIO, you have the flexibility to choose between LittleFS (default) and SPIFFS.
Default Configuration (LittleFS)
By default, PlatformIO projects are configured to use LittleFS. No changes are required.
Switching to SPIFFS
To use SPIFFS instead of LittleFS, you need to modify two settings in your platformio.ini file:
1. Change the filesystem type:
; to use spiffs, comment out "board_build.filesystem = littlefs",
; uncomment "board_build.filesystem = spiffs" and "-DPUARA_SPIFFS"
;board_build.filesystem = littlefs
board_build.filesystem = spiffs
2. Add the SPIFFS build flag:
build_flags =
    -DBOARD_HAS_PSRAM
    -DPUARA_SPIFFS    ; compilation flag to indicate the usage of spiffs lib instead of littlefs
Note: Make sure both settings are changed together. The
board_build.filesystemsetting determines how PlatformIO uploads the filesystem data, while the-DPUARA_SPIFFSbuild flag tells the puara-module library to use the SPIFFS API at compile time.
Web Server
The puara-module library includes an integrated web server that allows you to configure your device from a web browser. For more details on the browser pages from a user perspective, see Browser Pages.
Starting the Web Server
The web server is started automatically when you call the puara.start() method. You can also start and stop it manually:
httpd_handle_t server = puara.start_webserver();
puara.stop_webserver();
Accessing the Web Interface
Once the web server is running, you can access it in two ways:
-
Via IP Address: Navigate to the device’s IP address in your web browser (e.g.,
http://192.168.4.1for AP mode, or the assigned IP in STA mode which can be retrieved usingpuara.staIP()). -
Via mDNS Hostname: If mDNS is enabled, you can access the device using its hostname (e.g.,
http://your-device-name.local).
Web Pages
The web pages are stored in the data directory of your project. The puara-module library provides a set of default web pages that you can customize to suit your needs.
Default Pages
| File | Description |
|---|---|
index.html | The main page of the web interface where users can configure WiFi SSID and device settings. |
scan.html | Displays available WiFi networks for connection. |
settings.html | Allows users to configure custom variable values for the device. |
update.html | Reserved for future Over-The-Air (OTA) update functionality. |
reboot.html | Confirmation page displayed when the device is rebooting. |
saved.html | Confirmation page displayed after settings are saved. This triggers the callback registered via puara.set_settings_changed_handler(). |
Styling
The style.css file in the data directory controls the appearance of all web pages. You can modify this file to customize the look and feel of the web interface.
Customizing Web Pages
You can edit the HTML files in the data directory to change the appearance and functionality of the web interface. The web pages use a simple template system that allows you to insert dynamic values from your device into the HTML.
Note: After modifying files in the
datadirectory, you need to re-upload the filesystem to your device. See Filesystem for instructions on uploading filesystem data.
WiFi Considerations
The puara-module library provides a simple and flexible interface for managing WiFi connections. This document outlines the key WiFi-related features, modes, and public API functions available in the library.
WiFi Modes
The puara-module supports three modes of operation:
-
Station - Access Point (STA-AP) Mode:
- The device connects to an existing WiFi network (station).
- The device creates its own WiFi network (access point).
-
Access Point (AP) Mode:
-
The device does not connect to an existing WiFi network.
-
The device creates its own WiFi network (access point).
-
Useful for initial configuration or when no external WiFi network is available.
-
-
Station (STA) Mode:
- The device connects to an existing WiFi network.
- The Access Point is turned off with
persistent_AP=0 - Useful to limit WiFi pollution and secure the device.
Default Behavior
Device is STA-AP by default:
- The
puara-modulewill attempt to connect to a known WiFi network. If the connection succeeds or fails, the device will then activate it’s AP mode.
To deactivate STA, leave useless connection information (SSID, PSK) in config.json.
To deactivate AP mode, set the persistent_AP option to 0 in the config.json file or access the config page through the web server and tick the proper option about AP mode.
Public API Functions
The puara-module exposes the following public API functions for managing WiFi:
void start_wifi()
-
Description: Initializes the WiFi configuration and starts the WiFi service.
-
Behavior:
- Configures the device to operate in either STA-AP, STA or AP mode based on the
config.jsonsettings. - Ensures default values for SSID and passwords if they are missing or invalid.
void wifi_scan() - Configures the device to operate in either STA-AP, STA or AP mode based on the
-
Description: Scans for available WiFi networks and stores the results.
-
Behavior:
- The scan results include SSID, RSSI (signal strength), and channel information for each network.
- Results are displayed on the scan.html page of the web interface.
bool get_StaIsConnected()
- Description: Checks whether the device is connected to an external WiFi network in STA mode.
- Returns: Returns true if the device is connected, false otherwise.
std::string staIP()
-
Description: Retrieves the current IP address of the device when connected to an external WiFi network in STA-IP or STA modes.
-
Returns: The IP address as a string.
Serial and Debug Logging
The puara-module library provides a simple interface for serial communication, allowing you to send data and receive commands via the serial port.
Starting Serial Listening
Serial listening is started automatically when you call puara.start(). You can also start it manually:
bool success = puara.start_serial_listening();
Returns: true if serial listening was successfully started, false otherwise.
When serial listening is active, the device will listen for incoming commands on the serial port, allowing you to interact with and configure the device via a serial terminal.
Sending Serial Data
You can send data over the serial port using the send_serial_data() method:
puara.send_serial_data("Hello, world!");
Monitor Types
You can specify the serial monitor type when calling the start() method:
// Use JTAG monitor with debug-level logging
puara.start(PuaraAPI::JTAG_MONITOR, ESP_LOG_DEBUG);
Available Monitors
| Monitor | Description |
|---|---|
PuaraAPI::UART_MONITOR | Standard UART serial monitor (default). |
PuaraAPI::JTAG_MONITOR | JTAG-based debugging monitor. |
PuaraAPI::USB_MONITOR | USB serial monitor. |
Debug Levels
The second parameter of start() sets the ESP-IDF logging level:
| Level | Description |
|---|---|
ESP_LOG_NONE | No logging output. |
ESP_LOG_ERROR | Only error messages. |
ESP_LOG_WARN | Warnings and errors (default). |
ESP_LOG_INFO | Informational messages, warnings, and errors. |
ESP_LOG_DEBUG | Debug messages and all above. |
ESP_LOG_VERBOSE | All messages including verbose output. |
mDNS
The puara-module library includes built-in support for mDNS (multicast DNS), allowing your device to be discovered and accessed on the local network using a human-readable hostname instead of an IP address.
What is mDNS?
mDNS is a protocol that resolves hostnames to IP addresses within small networks without requiring a dedicated DNS server. It enables you to access your device using a .local domain name, making it much easier to connect to your device without needing to know its IP address.
Automatic Configuration
When you call puara.start(), the mDNS service is started automatically using the device’s DMI name (a combination of device and id from your config.json).
For example, with this configuration:
{
    "device": "Puara",
    "id": 1
}
The device will be accessible at: http://puara_001.local/
Manual Configuration
If you need to start the mDNS service manually with a custom name, use the start_mdns_service() method:
puara.start_mdns_service("my-device", "My Device Instance");
Parameters
| Parameter | Description |
|---|---|
device_name | The hostname for mDNS discovery. This becomes the .local address (e.g., my-device → http://my-device.local/). |
instance_name | A human-readable name for the service instance, visible in network discovery tools. |
Accessing Your Device
Once mDNS is running, you can access your device’s web interface by typing the hostname followed by .local in your browser:
http://<device_name>.local/
For example:
http://puara_001.local/http://my-sensor.local/
Troubleshooting
Device not found via .local address?
- Same network: Ensure your computer and the device are on the same network.
- mDNS support: Some networks (especially corporate/enterprise) block mDNS traffic. Try using the IP address directly instead.
- Windows: Older Windows versions may require Bonjour to be installed for
.localresolution. - Firewall: Check that your firewall allows mDNS traffic (UDP port 5353).
Tip: If you’re having trouble with mDNS, you can always access the device via its IP address. Use
puara.staIP()to retrieve the IP address in your code, or check your router’s connected devices list.